In this episode, we initialize our Pdf Invoice Generator app using with the Refine CLI Wizard and get familiar with the boilerplate code created. We also initialize our Strapi backend server and create the database collections we need.
This is Day 2 of the #RefineWeek series. This five-part tutorial that aims to help developers learn the ins-and-outs of Refine's powerful capabilities and get going with Refine within a week.
RefineWeek ft. Strapi series
- Day 1 - Pilot & Refine architecture
Overview
In the previous post, we got a preview of Refine's underlying architecture, especially on how Refine's core modules abstract and divide an app's logic inside individual providers and allow their methods to be easily accessed and invoked with hooks from inside consumer components. This abstraction at the providers layer is where Refine shines and require extensive configuration to begin with.
In this part, we will get into the details of two important providers: namely, dataProvider and authProvider that are passed to the <Refine /> component. We will be building on this knowledge in the coming episodes.
These two providers will be generated by the Refine CLI wizard which allows us to interactively choose desired supplementary packages for our project. We'll use Strapi for our backend and Ant Design for the UI. So, let's start off with setting up the Pdf Invoice Generator app right away.
Project Setup
For this project, we are using Strapi as our backend service. Refine comes with an optional package for Strapi that gives us dataProvider and authProvider definitions out-of-the-box for handling requests related to CRUD actions, authentication and authorization against models hosted in a Strapi instance.
We are going to include Refine's Ant Design package for the UI side.
We have two options for bootstrapping a new Refine application: https://refine.new/ browser tool and create refine-app CLI tool. You can choose whichever you prefer.
- refine.new
- create refine-app
refine.new is a powerful open-source tool that lets you create React-based, headless UI enterprise applications right in your browser. You have the ability to preview, modify, and download your project immediately, thereby streamlining the development process.
Building Refine CRUD apps with refine.new is very straight forward. You can choose the libraries and frameworks you want to work with, and the tool will generate a boilerplate code for you.
For this tutorial, we'll be select the following options: React Platform: Create React App UI Framework: Ant Design Backend: Strapi Authentication Provider: Strapi
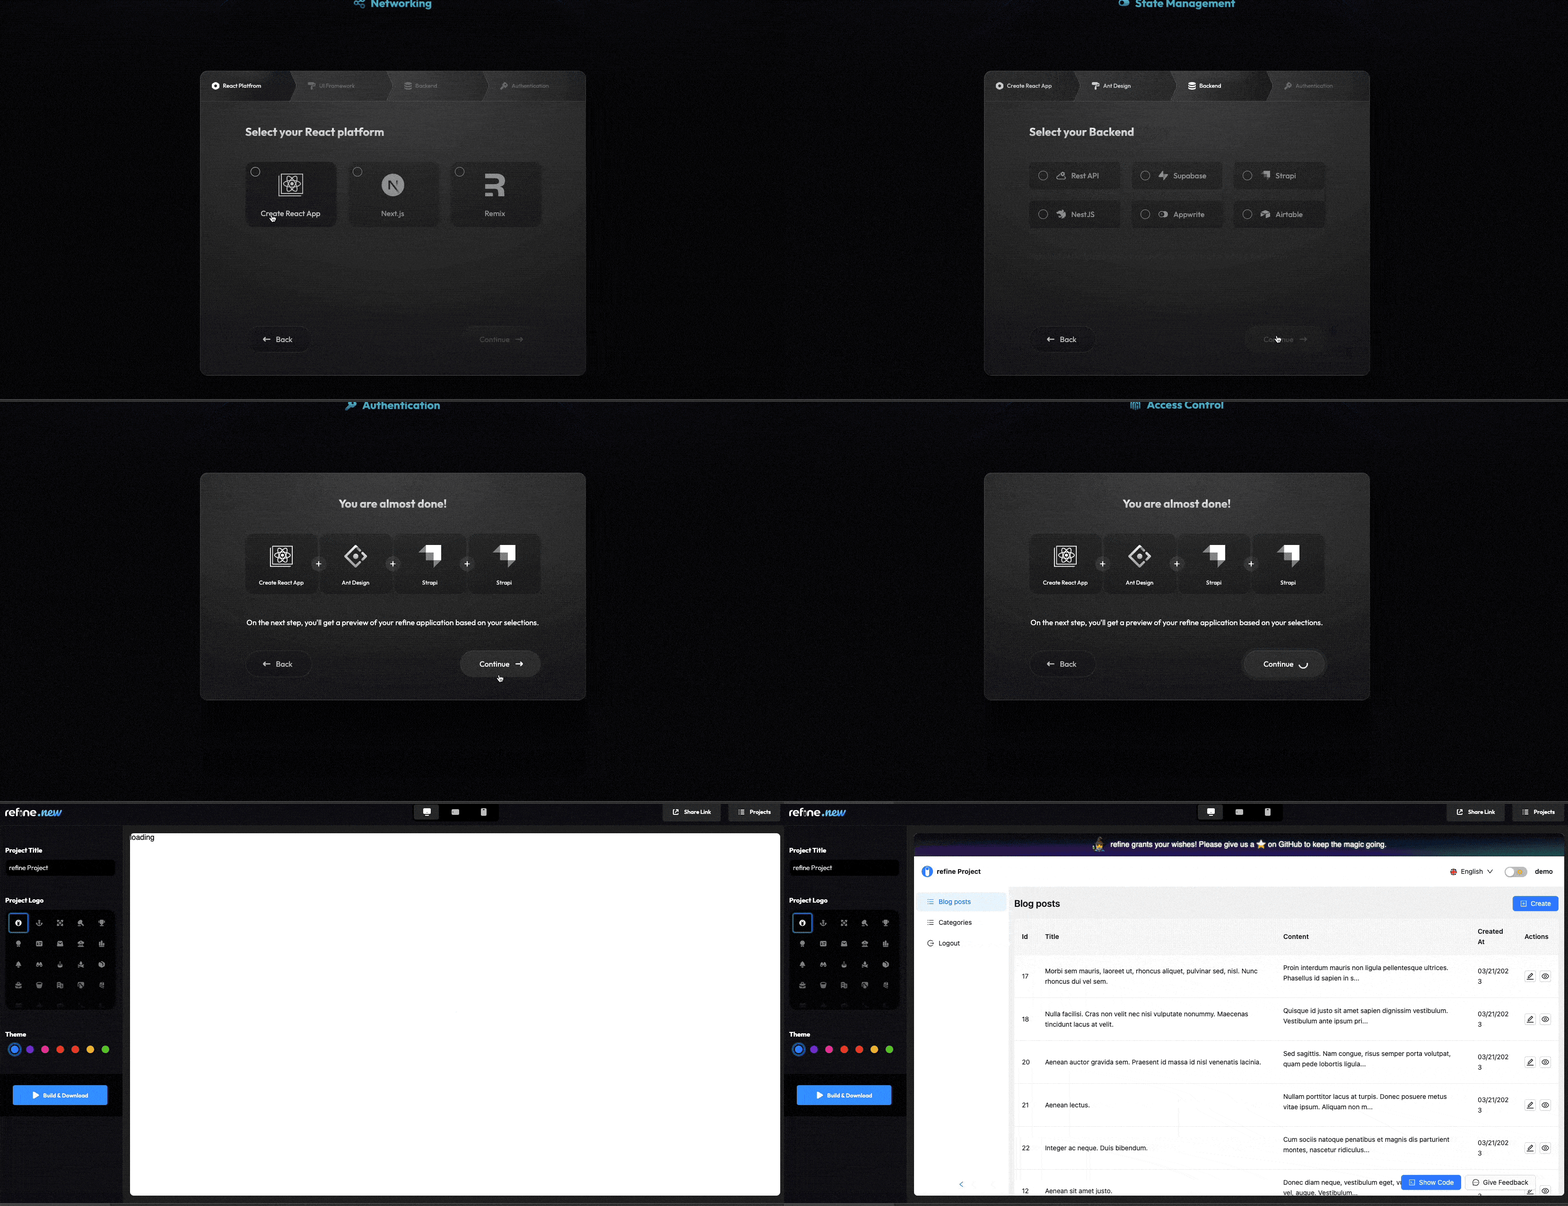
After complete the step you can download the project and run it locally.
Let's go ahead and use the npm create refine-app command to interactively initialize the project. Navigate to a folder of your choice and run:
npm create refine-app@latest pdf-invoice-generator
The CLI wizard presents us with a set of questions for choosing the libraries and frameworks we want to work with. We'll initialize a Refine project with CRA. We would like to generate some example pages so that we can use the boilerplate code to add our own resources and route definitions. So, I went ahead and chose the following options:
✔ Choose a project template · refine-react
✔ What would you like to name your project?: · blog-pdf-invoice-generator
✔ Choose your backend service to connect: · Strapi
✔ Do you want to use a UI Framework?: · Ant Design
✔ Do you want to add example pages?: · Yes
✔ Do you need i18n (Internationalization) support?: · No
✔ Choose a package manager: · npm
✔ Would you mind sending us your choices so that we can improve create refine-app? · yes
This should create a rudimentary Refine app that supports Ant Design in the UI and Strapi in the backend.
If we open the app in our code editor, we can see that Refine's optional packages for Ant Design and Strapi are added to package.json:
"dependencies": {
    "@ant-design/icons": "^5.0.1",
    "@react-pdf/renderer": "^3.1.8",
    "@refinedev/antd": "^5.3.10",
    "@refinedev/cli": "^2.1.2",
    "@refinedev/core": "^4.5.6",
    "@refinedev/inferencer": "^3.0.0",
    "@refinedev/kbar": "^1.0.0",
    "@refinedev/react-router-v6": "^4.0.0",
    "@refinedev/strapi-v4": "^4.0.0",
    "antd": "^5.0.5",
    "axios": "^1.6.2",
    "react": "^18.0.0",
    "react-dom": "^18.0.0",
    "react-router-dom": "^6.8.1",
    "react-scripts": "^5.0.0"
  },
We are going to use Ant Design components for our UI thanks to the @refinedev/antd and antd packages. @refinedev/strapi-v4 module allows us to use Refine's Strapi auth and data providers.
We'll cover these Strapi related providers more extensively as we add features to our app in the upcoming episodes. However, let's try building the app for now, and check what we have in the browser after running the development server. In the terminal, run the following command:
npm run dev
After that, if we navigate to http://localhost:3000, and we should have a Refine app asking us to log in:

If we log in with the default values, we should be able to view a dashboard with the following blog posts and categories resources:

Exploring the App
Let's now see what Refine scaffolded for us during initialization.
Our main point of focus is the src folder. And for now, especially the <App /> component.
If we look inside the App.tsx file, we can see among others a <Refine /> component crowded with passed in props and a child <Routes /> component housing a series of <Route /> subcomponents:
import { Authenticated, GitHubBanner, Refine } from "@refinedev/core";
import { RefineKbar, RefineKbarProvider } from "@refinedev/kbar";

import { AuthPage, ErrorComponent, ThemedLayout, useNotificationProvider } from "@refinedev/antd";
import "@refinedev/antd/dist/reset.css";

import routerBindings, {
  CatchAllNavigate,
  NavigateToResource,
  UnsavedChangesNotifier,
} from "@refinedev/react-router-v6";
import { DataProvider } from "@refinedev/strapi-v4";
import { BlogPostCreate, BlogPostEdit, BlogPostList, BlogPostShow } from "pages/blog-posts";
import { CategoryCreate, CategoryEdit, CategoryList, CategoryShow } from "pages/categories";
import { BrowserRouter, Outlet, Route, Routes } from "react-router-dom";
import { authProvider, axiosInstance } from "./authProvider";
import { Header } from "./components/header";
import { API_URL } from "./constants";
import { ColorModeContextProvider } from "./contexts/color-mode";

function App() {
  return (
    <BrowserRouter>
      <GitHubBanner />
      <RefineKbarProvider>
        <ColorModeContextProvider>
          <Refine
            authProvider={authProvider}
            dataProvider={DataProvider(API_URL + `/api`, axiosInstance)}
            notificationProvider={useNotificationProvider}
            routerProvider={routerBindings}
            resources={[
              {
                name: "blog-posts",
                list: "/blog-posts",
                create: "/blog-posts/create",
                edit: "/blog-posts/edit/:id",
                show: "/blog-posts/show/:id",
                meta: {
                  canDelete: true,
                },
              },
              {
                name: "categories",
                list: "/categories",
                create: "/categories/create",
                edit: "/categories/edit/:id",
                show: "/categories/show/:id",
                meta: {
                  canDelete: true,
                },
              },
            ]}
            options={{
              syncWithLocation: true,
              warnWhenUnsavedChanges: true,
            }}
          >
            <Routes>
              <Route
                element={
                  <Authenticated fallback={<CatchAllNavigate to="/login" />}>
                    <ThemedLayout Header={Header}>
                      <Outlet />
                    </ThemedLayout>
                  </Authenticated>
                }
              >
                <Route index element={<NavigateToResource resource="blog-posts" />} />
                <Route path="/blog-posts">
                  <Route index element={<BlogPostList />} />
                  <Route path="create" element={<BlogPostCreate />} />
                  <Route path="edit/:id" element={<BlogPostEdit />} />
                  <Route path="show/:id" element={<BlogPostShow />} />
                </Route>
                <Route path="/categories">
                  <Route index element={<CategoryList />} />
                  <Route path="create" element={<CategoryCreate />} />
                  <Route path="edit/:id" element={<CategoryEdit />} />
                  <Route path="show/:id" element={<CategoryShow />} />
                </Route>
              </Route>
              <Route
                element={
                  <Authenticated fallback={<Outlet />}>
                    <NavigateToResource />
                  </Authenticated>
                }
              >
                <Route
                  path="/login"
                  element={
                    <AuthPage
                      type="login"
                      formProps={{
                        initialValues: {
                          email: "demo@refine.dev",
                          password: "demodemo",
                        },
                      }}
                    />
                  }
                />
              </Route>
              <Route
                element={
                  <Authenticated>
                    <ThemedLayout Header={Header}>
                      <Outlet />
                    </ThemedLayout>
                  </Authenticated>
                }
              >
                <Route path="*" element={<ErrorComponent />} />
              </Route>
            </Routes>

            <RefineKbar />
            <UnsavedChangesNotifier />
          </Refine>
        </ColorModeContextProvider>
      </RefineKbarProvider>
    </BrowserRouter>
  );
}

export default App;
Take an early note of the resources prop. The resources and their corresponding routes are added as part of the examples that we opted for while initializing the project with the Refine CLI Wizard. We are going to remove these resources and route definitions and add our own in the coming episodes.
Note also the presentation of the <AuthPage /> component at the /login path. We will come to this in a section related to authentication on Day 3.
For the most part, the meat of an app is configured and built around the above indicated props and routes. Today, we'll examine a few of these props so that we are ready to move to the next episode. But let's begin with the <Refine /> component first.
The <Refine /> Component
The <Refine /> component is the entry point of a Refine app. In order to leverage the power of Refine's abstraction layers, we need to have the <Refine /> component.
Then we have to configure the <Refine /> component with the provider objects we want to use in our app. We can see that CLI Wizard already added the dataProvider and authProvider props for us inside <Refine /> out-of-the-box. We will be using them in our app. Some provider objects like the notificationProvider or the dataProvider are defined for us by Refine's core or support modules and some like the accessControlProvider have to be defined by ourselves.
Besides, some providers such as the authProvider can / have to be tailored according to our app's needs and some like the Strapi-specific dataProvider by @refinedev/strapi-v4 come packaged completely and cannot be extended or modified.
<Refine />'s dataProvider Prop
Refine's data provider is the context which allows the app to communicate with a backend API via a HTTP client. It subsequently makes response data returned from HTTP requests available to consumer components via a set of Refine data hooks.
If we look closely, the dataProvider prop derives a value from a call to DataProvider() function:
// Inside App.tsx
    dataProvider={DataProvider(API_URL + `/api`, axiosInstance)}
The returned object, called the dataProvider object, has the following signature:
Show dataProvider.ts code
// Data provider object signature

const dataProvider: DataProvider = {
  // required methods
  getList: ({ resource, pagination, sorters, filters, meta }) => Promise,
  create: ({ resource, variables, meta }) => Promise,
  update: ({ resource, id, variables, meta }) => Promise,
  deleteOne: ({ resource, id, variables, meta }) => Promise,
  getOne: ({ resource, id, meta }) => Promise,
  getApiUrl: () => "",

  // optional methods
  getMany: ({ resource, ids, meta }) => Promise,
  createMany: ({ resource, variables, meta }) => Promise,
  deleteMany: ({ resource, ids, variables, meta }) => Promise,
  updateMany: ({ resource, ids, variables, meta }) => Promise,
  custom: ({ url, method, filters, sorters, payload, query, headers, meta }) => Promise,
};
Each item in this object is a method that has to be defined by us or Refine's data provider packages.
Refine supports 15+ backend dataProvider integrations as optional packages that come with distinct definitions of these methods that handle CRUD operations according to their underlying architectures. The full list can be found here.
Normally, for our own backend API, we have to define each method we need for sending http requests inside a dataProvider object as above. But since we are using Strap as our backend and the @refinedev/strapi-v4 package to communicate with it, dataProvider={DataProvider(API_URL + /api, axiosInstance)} makes the following object available to us:
Show Strapi data provider source code
// version 4.1.0

export const DataProvider = (apiUrl: string, httpClient: AxiosInstance = axiosInstance): Required<IDataProvider> => ({
  getList: async ({ resource, pagination, filters, sorters, meta }) => {
    const url = `${apiUrl}/${resource}`;

    const { current = 1, pageSize = 10, mode = "server" } = pagination ?? {};

    const locale = meta?.locale;
    const fields = meta?.fields;
    const populate = meta?.populate;
    const publicationState = meta?.publicationState;

    const quertSorters = generateSort(sorters);
    const queryFilters = generateFilter(filters);

    const query = {
      ...(mode === "server"
        ? {
            "pagination[page]": current,
            "pagination[pageSize]": pageSize,
          }
        : {}),
      locale,
      publicationState,
      fields,
      populate,
      sort: quertSorters.length > 0 ? quertSorters.join(",") : undefined,
    };

    const { data } = await httpClient.get(
      `${url}?${stringify(query, {
        encodeValuesOnly: true,
      })}&${queryFilters}`,
    );

    return {
      data: normalizeData(data),
      // added to support pagination on client side when using endpoints that provide only data (see https://github.com/refinedev/refine/issues/2028)
      total: data.meta?.pagination?.total || normalizeData(data)?.length,
    };
  },

  getMany: async ({ resource, ids, meta }) => {
    const url = `${apiUrl}/${resource}`;

    const locale = meta?.locale;
    const fields = meta?.fields;
    const populate = meta?.populate;
    const publicationState = meta?.publicationState;

    const queryFilters = generateFilter([
      {
        field: "id",
        operator: "in",
        value: ids,
      },
    ]);

    const query = {
      locale,
      fields,
      populate,
      publicationState,
      "pagination[pageSize]": ids.length,
    };

    const { data } = await httpClient.get(
      `${url}?${stringify(query, {
        encodeValuesOnly: true,
      })}&${queryFilters}`,
    );

    return {
      data: normalizeData(data),
    };
  },

  create: async ({ resource, variables }) => {
    const url = `${apiUrl}/${resource}`;

    let dataVariables: any = { data: variables };

    if (resource === "users") {
      dataVariables = variables;
    }

    const { data } = await httpClient.post(url, dataVariables);
    return {
      data,
    };
  },

  update: async ({ resource, id, variables }) => {
    const url = `${apiUrl}/${resource}/${id}`;

    let dataVariables: any = { data: variables };

    if (resource === "users") {
      dataVariables = variables;
    }

    const { data } = await httpClient.put(url, dataVariables);
    return {
      data,
    };
  },

  updateMany: async ({ resource, ids, variables }) => {
    const response = await Promise.all(
      ids.map(async (id) => {
        const url = `${apiUrl}/${resource}/${id}`;

        let dataVariables: any = { data: variables };

        if (resource === "users") {
          dataVariables = variables;
        }
        const { data } = await httpClient.put(url, dataVariables);
        return data;
      }),
    );

    return { data: response };
  },

  createMany: async ({ resource, variables }) => {
    const response = await Promise.all(
      variables.map(async (param) => {
        const { data } = await httpClient.post(`${apiUrl}/${resource}`, {
          data: param,
        });
        return data;
      }),
    );

    return { data: response };
  },

  getOne: async ({ resource, id, meta }) => {
    const locale = meta?.locale;
    const fields = meta?.fields;
    const populate = meta?.populate;

    const query = {
      locale,
      fields,
      populate,
    };

    const url = `${apiUrl}/${resource}/${id}?${stringify(query, {
      encode: false,
    })}`;

    const { data } = await httpClient.get(url);

    return {
      data: normalizeData(data),
    };
  },

  deleteOne: async ({ resource, id }) => {
    const url = `${apiUrl}/${resource}/${id}`;

    const { data } = await httpClient.delete(url);

    return {
      data,
    };
  },

  deleteMany: async ({ resource, ids }) => {
    const response = await Promise.all(
      ids.map(async (id) => {
        const { data } = await httpClient.delete(`${apiUrl}/${resource}/${id}`);
        return data;
      }),
    );
    return { data: response };
  },

  getApiUrl: () => {
    return apiUrl;
  },

  custom: async ({ url, method, filters, sorters, payload, query, headers }) => {
    let requestUrl = `${url}?`;

    if (sorters) {
      const sortQuery = generateSort(sorters);
      if (sortQuery.length > 0) {
        requestUrl = `${requestUrl}&${stringify({
          sort: sortQuery.join(","),
        })}`;
      }
    }

    if (filters) {
      const filterQuery = generateFilter(filters);
      requestUrl = `${requestUrl}&${filterQuery}`;
    }

    if (query) {
      requestUrl = `${requestUrl}&${stringify(query)}`;
    }

    if (headers) {
      httpClient.defaults.headers = {
        ...httpClient.defaults.headers,
        ...headers,
      };
    }

    let axiosResponse;
    switch (method) {
      case "put":
      case "post":
      case "patch":
        axiosResponse = await httpClient[method](url, payload);
        break;
      case "delete":
        axiosResponse = await httpClient.delete(url, {
          data: payload,
        });
        break;
      default:
        axiosResponse = await httpClient.get(requestUrl);
        break;
    }

    const { data } = axiosResponse;

    return Promise.resolve({ data });
  },
});
This overwhelming and intimidating, but if we skim over closely, the dataProvider object above has pretty much every method we need to perform all CRUD operations against a Strapi backend. Under the hood, all these methods implement RESTful conventions and are tied up with appropriate RESTful resources and routes thanks to Refine's sensible defaults.
Notable methods that we are going to use in our app are: create(), getList(), update() and delete(). Also notice that the @refinedev/strapi-4 package uses axios to communicate with the Strapi server.
For the details of how these methods work, please take your time to scan through the dataProvider API reference.
Strapi Client
In order to get the Strapi dataProvider object to deliver, we have to pass an axios instance and the API_URL of the Strapi server we are running as our backend.
For the DataProvider function above, inside App.tsx we are importing axiosInstance from the authProvider.ts file. For the API_URL, we will have to set up a Strapi server before we can modify the src/constants.ts file:
export const API_URL = "https://api.strapi-v4.refine.dev";
export const TOKEN_KEY = "strapi-jwt-token";
We'll come to this in on Day 3, but let's look at the authProvider prop now.
<Refine />'s authProvider Prop
We can clearly see in our <Refine /> component that the Refine CLI Wizard already enabled the authProvider prop by passing in the corresponding object for us:
<Refine authProvider={authProvider} />
Earlier on, the authProvider object was created by the CLI Wizard inside the authProvider.ts file:
Show AuthProvider code
import { AuthProvider } from "@refinedev/core";
import { AuthHelper } from "@refinedev/strapi-v4";

import { API_URL, TOKEN_KEY } from "./constants";

import axios from "axios";

export const axiosInstance = axios.create();
const strapiAuthHelper = AuthHelper(API_URL + "/api");

export const authProvider: AuthProvider = {
  login: async ({ email, password }) => {
    const { data, status } = await strapiAuthHelper.login(email, password);
    if (status === 200) {
      localStorage.setItem(TOKEN_KEY, data.jwt);

      // set header axios instance
      axiosInstance.defaults.headers.common["Authorization"] = `Bearer ${data.jwt}`;

      return {
        success: true,
        redirectTo: "/",
      };
    }
    return {
      success: false,
      error: new Error("Invalid username or password"),
    };
  },
  logout: async () => {
    localStorage.removeItem(TOKEN_KEY);
    return {
      success: true,
      redirectTo: "/login",
    };
  },
  onError: async (error) => {
    console.error(error);
    return { error };
  },
  check: async () => {
    const token = localStorage.getItem(TOKEN_KEY);
    if (token) {
      axiosInstance.defaults.headers.common["Authorization"] = `Bearer ${token}`;
      return {
        authenticated: true,
      };
    }

    return {
      authenticated: false,
      error: new Error("Not authenticated"),
      logout: true,
      redirectTo: "/login",
    };
  },
  getPermissions: async () => null,
  getIdentity: async () => {
    const token = localStorage.getItem(TOKEN_KEY);
    if (!token) {
      return null;
    }

    const { data, status } = await strapiAuthHelper.me(token);
    if (status === 200) {
      const { id, username, email } = data;
      return {
        id,
        name: username,
        email,
      };
    }

    return null;
  },
};
This object has all the methods we need to implement an email / password based authentication and authorization system in our app.
Notice, as mentioned before, that authProvider relies on Strapi API_URL to connect to our Strapi database. So, in this case, our authProvider was generated as part of the Strapi package.
As we can infer by now, although we have stated that Refine performs and manages a lot of heavylifting and simplifies the app logic by dividing concerns into separate contexts, providers and hooks, configuring all these providers is a heavy task itself.
It, fortunately, makes configuration easier by composing individual providers inside a single object.
These are pretty much the essentials we should get familiar with in order to start adding resources to the <Refine /> component. Prior to that though, let's go ahead and spin up a Strapi server add some collections to store our data.
Refine with a Strapi Backend
For this app, we are going to have several collections in stored with the Strapi backend server. The entity relational diagram looks like this:

We deal with the missions and invoices collections on Day 4, but today we are concerned with setting up only the companies, clients and contacts collections. The relationship between a client and contacts is also has many optional, i.e., a client can have many contacts.
With this in mind, let's go ahead and initialize a Strapi project.
Setting Up Strapi Instance
We'll initialize a local Strapi project first and then create the above mentioned collections. In order to create a local Strapi instance, go to the folder of your choice and run the following command from the terminal:
npx create-strapi-app@latest pdf-invoice-generator --quickstart
Useful details for creating a Strapi project is available in this quickstart guide.
After successful initialization, this will have a Strapi project created and spun up at http://localhost:1337.
Setting Up Admin User for Strapi
Next, we have to be able to access the Strapi Admin UI that is hosted locally in our machine. So, we have to register an admin user. If you are not already familiar with creating an admin user, please follow this section of the guide.
The admin dashboard at /admin after signing up and logging in should look something like this:
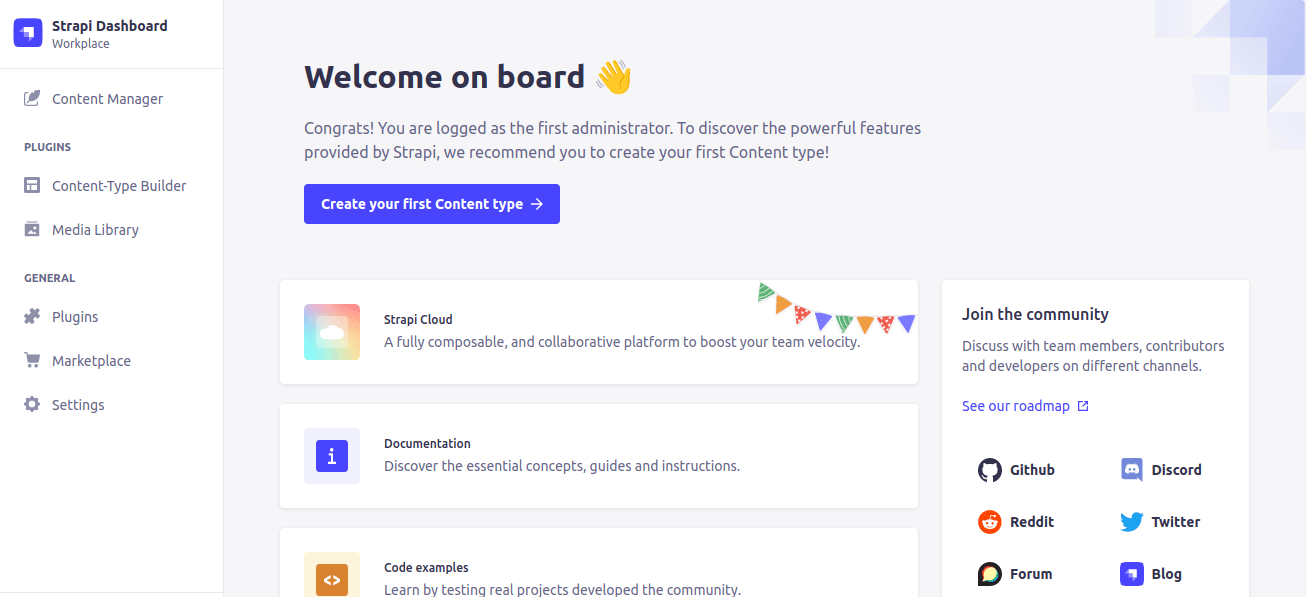
Having access to the Strapi admin dashboard, we are ready to go ahead and create our collections.
Creating Strapi Collections
We can create collections using the Content-Type Builder plugin available in the Strapi admin dashboard. More details are available in this section of the Strapi quickstart guide.
Users Collection
The users collection is already created when we initialize a Strapi instance. It is available under the users-permissions.user collection type.
Companies Collection
The companies collection should look like this:
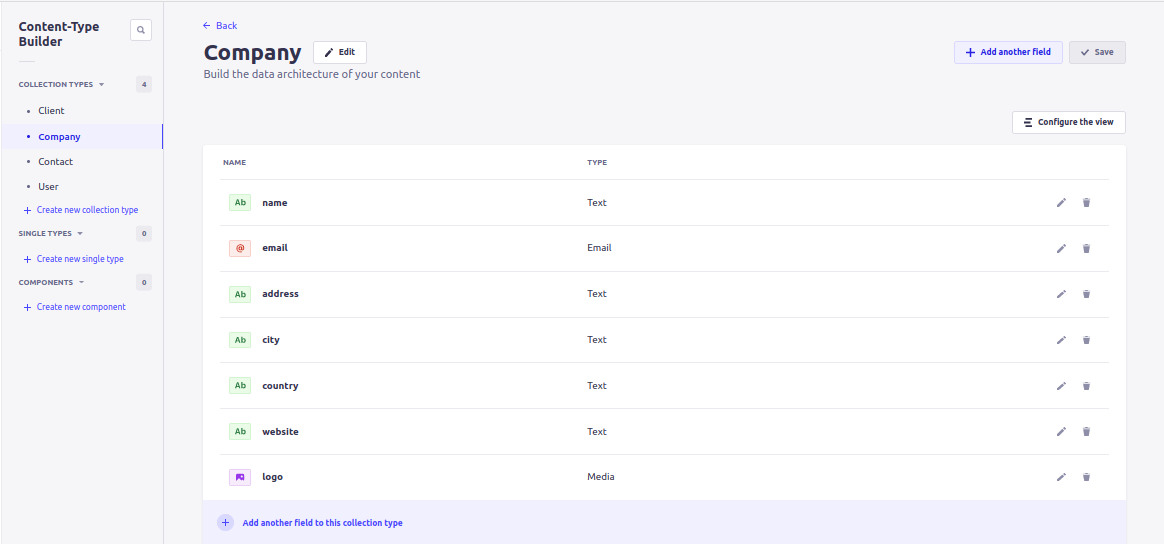
Clients Collection
The clients collection looks like this:

clients has a has many optional relation with contacts. So, its relation with contacts looks like this:
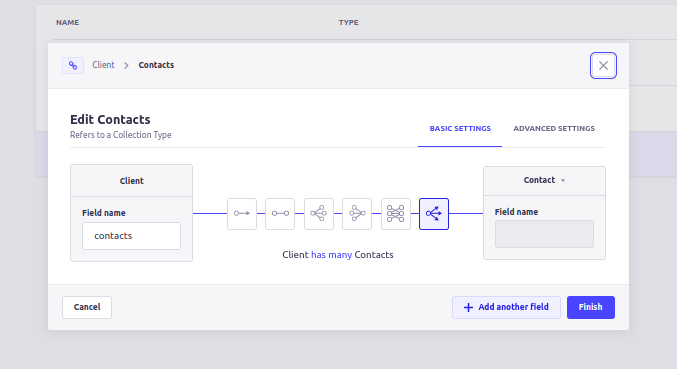
Contacts Collection
The contacts collection should look as below:
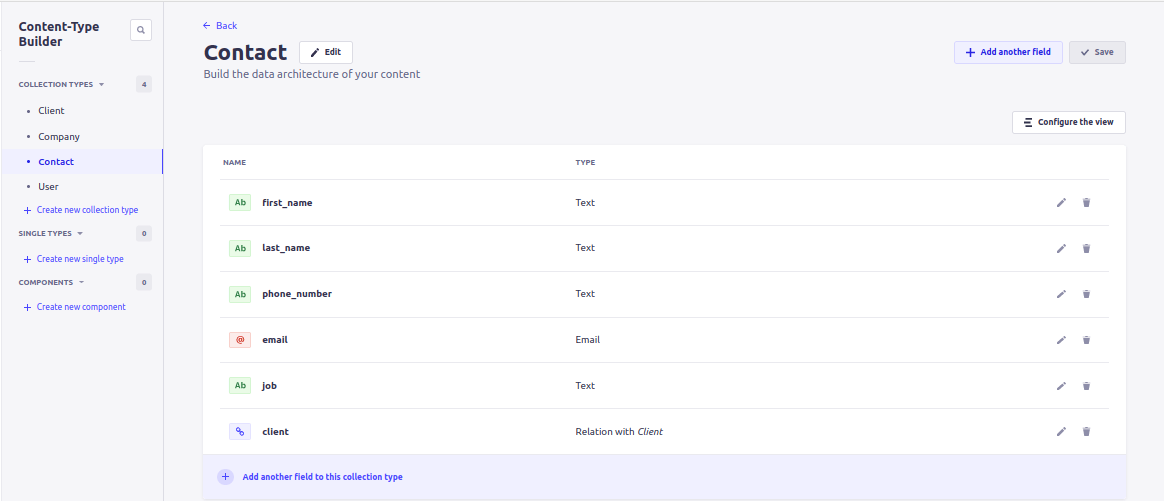
And a contact has a has one association with client:
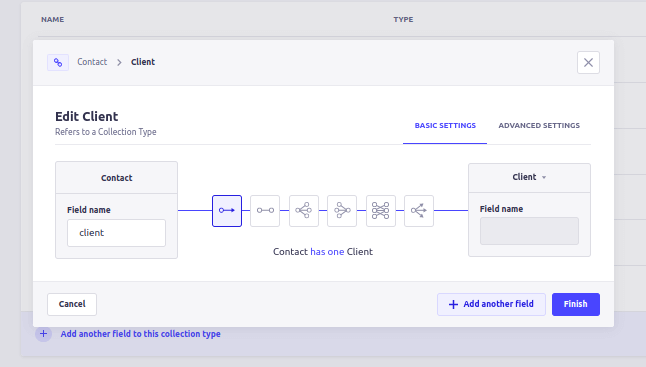
With these set up, we need to create an app user and set roles for authenticated users to access the Strapi data. Let's do that next.
Setting Up App Roles for Strapi
For the authentication credentials presented in the form to work, we have to create a user at the Strapi app running at http://localhost:1337. We can do that by logging in to the Strapi dashboard and then to Content Manager >> Users section. Let's create a user with the same email and password as in the Refine login form we had above:
email: demo@refine.dev
password: demodemo
After creating the app user, we need to set the value of its role field to Authenticated:

We only want our app users to access the CRUD actions when Authenticated. So, let's set the appropriate permissions from Settings >> USERS & PERMISSIONS >> Roles. More details are available in this section of the Strapi quickstart guide.
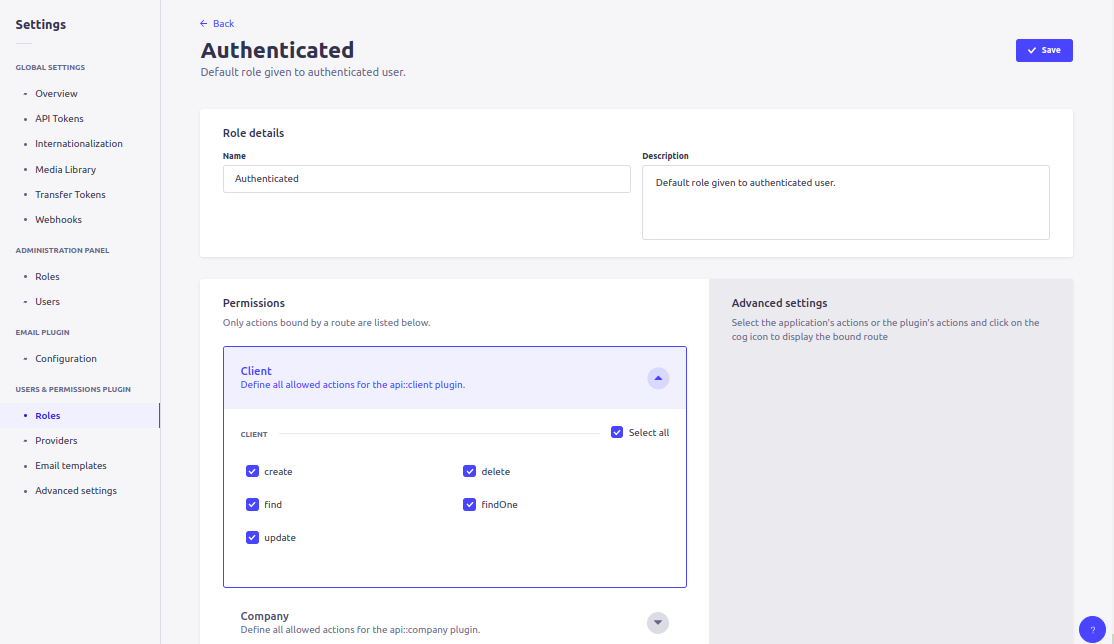
We need to set up permissions for each of our resources. So, please go ahead and do them for all the others.
With these completed, we are now ready to start adding resources to our Refine app.
Summary
In this post, we went through the process of initializing our Pdf Invoice Generator app with a Strapi backend and Ant Design UI framework.
We then explored the boilerplate code created by Refine CLI Wizard, especially the files related to dataProvider and authProvider props of the <Refine /> component. We touched on setting up a Strapi axiosInstance which is used by these providers to send HTTP requests to the Strapi backend.
We also set up the Strapi backend app, its API Token, most of our collections and also specified permissions for the authenticated role.
In the next episode, we add resources so that we can connect our Refine app to the Strapi server and then implement CRUD operations on our Pdf Invoice Generator app.

